
Check list for imported documents
This article is relevant for
LEADER
Introduction
This article is relevant, if you have requested the import of a document from Word or the upload of the latest version of a standard into OSD.
While creating content into OSD, certain elements from earlier editions of the standards may no longer be supported by the ISO/IEC Directives, Part 2, or may now require different coding structures.
During the upload process, the technical team prepares the document to the highest possible quality. However, some elements may require additional review and corrective action by the author.
Checklist
Review the document to ensure the following:
- Normative and bibliographic references are present and correctly tagged throughout the document.
- The Bibliography contains no grey boxes with question marks.
- Cross-references are present and functioning correctly.
- All graphics requiring revisable graphics files include the required files.
- All Figures are present and complete.
- Figures containing subfigures are present and complete.
- Figure keys are present, complete, and formatted as definition tables.
- Units statements are included in Figures where required.
- Figure and subfigure titles are present and correctly positioned.
- Formulae are present, accurate, and correctly formatted as formula or inline formula.
- All tables include complete table footers.
- Table border thickness is applied correctly throughout the document.
- Lists are formatted correctly.
Please note:
Detailed guidance for each checklist item is provided below.
Items for your review:
Normative and bibliographic references
Clause 2 - Normative references and the Bibliography clause may appear empty or incomplete when the document is received. Missing references must be recreated.
These clauses are automatically added to every project and cannot be edited directly in OSD. They populate automatically based on references inserted within the document body. Authors are responsible for inserting correct references (including publication years where required) so that they appear correctly in these clauses.
To ensure normative and bibliographic references are present and correctly tagged throughout the document, use the Content quality check to identify untagged elements:
- Enable content quality check.
- Select the filter for referencing: External references
-
Identify untagged references.

More details can be found here: Content quality check.
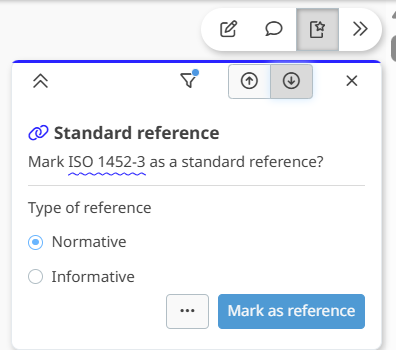
If necessary, recreate references. To do so:
- Highlight the relevant text
- Select REFERENCE → Link → Link to reference
- Ensure a single space exists on both sides of the reference.
More details can be found here: Add normative and bibliographic references
Broken bibliographic references
Bibliographic references appear in the Bibliography clause at the end of the document.
A broken reference (if the reference number is missing, or the reference is not linked within the document), may appear as a grey box containing a question mark.

Resolution:
- Delete the broken reference.
- Recreate it using the reference linking procedure.
For more details on how to do this, refer to this article: Add normative and bibliographic references
Broken or missing cross-references
A cross-reference links a selected text to an internal element such as a Figure or Table. It is updated automatically when numbering of the referenced element changes. Issues with cross references in imported documents may include: missing or broken links. These are displayed as red boxes with a question mark.
To verify cross-references are present and correct throughout the document:
- Enable Content quality check.
- Select Referencing → Internal references.
For more details on how to do this, refer to this article: Content quality check.

If needed, recreate a cross-reference:
- Select the relevant text
- Go to REFERENCE → Link → Cross-reference
- Ensure a single space exists on both sides of the reference.
More details can be found here: In-document (cross-) references
Missing graphical elements
Graphical elements may be missing in the imported document. All graphics must be reviewed and (re)inserted if not included:
To do so:
- Go to INSERT → Graphics
For more details, refer to the article: Add, edit and remove graphics.
Inserting revisable graphics files
Graphics requiring revisable files must also include the corresponding revisable file. For more information on revisable graphics file, refer to the document: Requirements and guidelines for the submission of drafts to ISO/CS in the Drafting standards page.
If the required revisable graphics files are missing, you can upload them again. For more details on how to do this, refer to: Edit asset metadata / add a missing revisable file.
Inserting missing figures
Figures include graphical elements, titles, and optional keys and notes. It is important to ensure that all Figures are present and complete in the imported document.
If required, you can (re) insert figures:
- Place the cursor at the insertion point.
- Select:
- INSERT → Graphics → Figure (to insert a graphic with title), or
- INSERT → Graphics → Image (to insert a graphic without title).
- Select the graphic from the image library that is displayed or first upload a new asset into the image library, and then select it.
- A screenshot of the PDF or Word version graphic can be used.
- Remember to upload the revisable version of the graphic as this is required at the time of submission to ISO/CS.
For more details, refer to the article: Add figures
Missing subfigures
A Figure containing subfigures groups multiple graphics with individual subtitles. A set of subfigures or individual subfigures may be missing in the imported document. Ensure that all Figures containing subfigures are present and complete, and add them if they are missing.
For more details, refer to the article: Add, edit, and remove graphics (section: Figure containing sub-figures)
If less than 3 subfigures are missing:
- Place the cursor at the insertion point.
- Go to INSERT → Graphics → Figure containing sub-figures
- Select the first graphic from the image library that is displayed or first upload it as a new asset into the image library, and then select it.
- A screenshot of the PDF or Word version graphic can be used.
- Click on the LAYOUT edit icon and select an appropriate layout (1X2, 2X1, 1X3 or 2X2)
-
For each subsequent subfigure, click on the more options (three dots or context) menu at the figure element level, and select Add subfigure
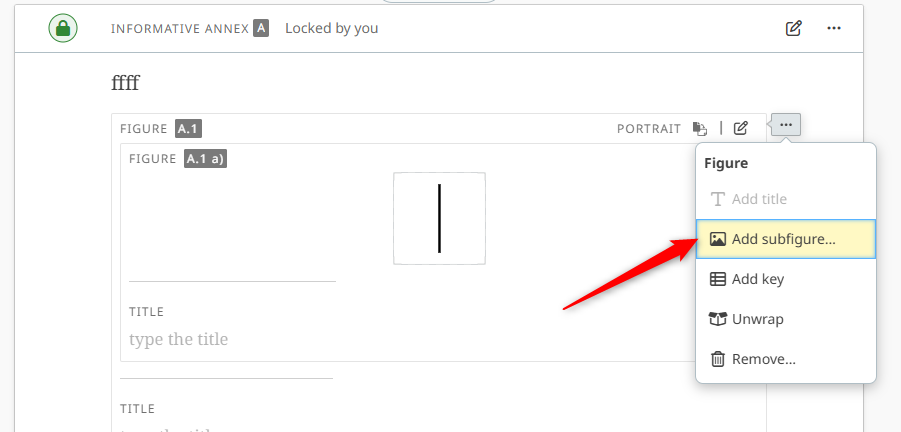

- Select the graphic from the image library that is displayed or first upload it as a new asset into the image library, and then select it.
- A screenshot of the PDF or Word version graphic can be used.
- Repeat the above steps for all subfigures.
If more than 3 subfigures are missing:
- Place the cursor at the insertion point.
- Go to INSERT> Graphics > Figure
- Select the graphic from the image library that is displayed or first upload it as a new asset into the image library, and then select it.
- A screenshot of the PDF or Word version graphic can be used.
- To delete the graphic in the OSD editor, select it and press the Delete key on the keyboard. The graphic will be removed.
- Click the more options (three dots or context) menu at the figure element level, and select Add... and then Add array
-
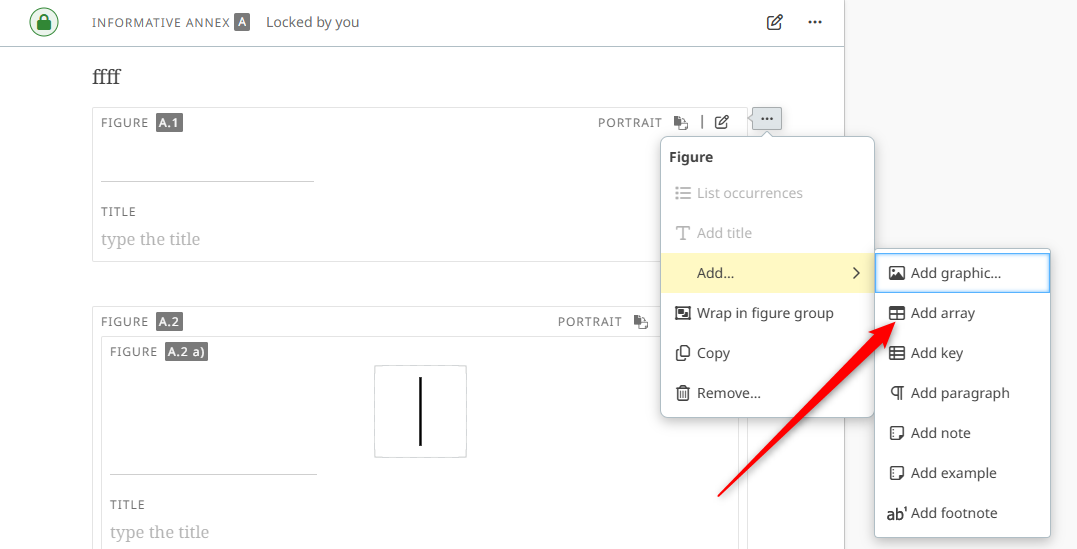

- In the array table created, right click on a cell and select Split cell to split the cells and create the table as required. Ensure each subfigure is in one cell, and that the cell below each subfigure is used for its title.
- In each cell for a graphical element, place the cursor, then go to INSERT→ Graphics→ Image
- In each cell for the subfigure title, add the subfigure title (e.g: a) title).
- Remember to upload the revisable graphic file, as this would be required at the time of submission to ISO/CS.
Missing Figure Key
A Figure key is a two-column table beneath the graphic::
- Left column: graphical key reference (graphical elements representing the graphical elements in the main Figure)
- Right column: description of the key reference.
It is possible that a Key is missing from a Figure, or that the key is not in the format of a Definitions table in the imported document.

To add or correct a key in a figures:
-
Click the more options (three dots or context) menu at the figure element level and select Add... and then Add key
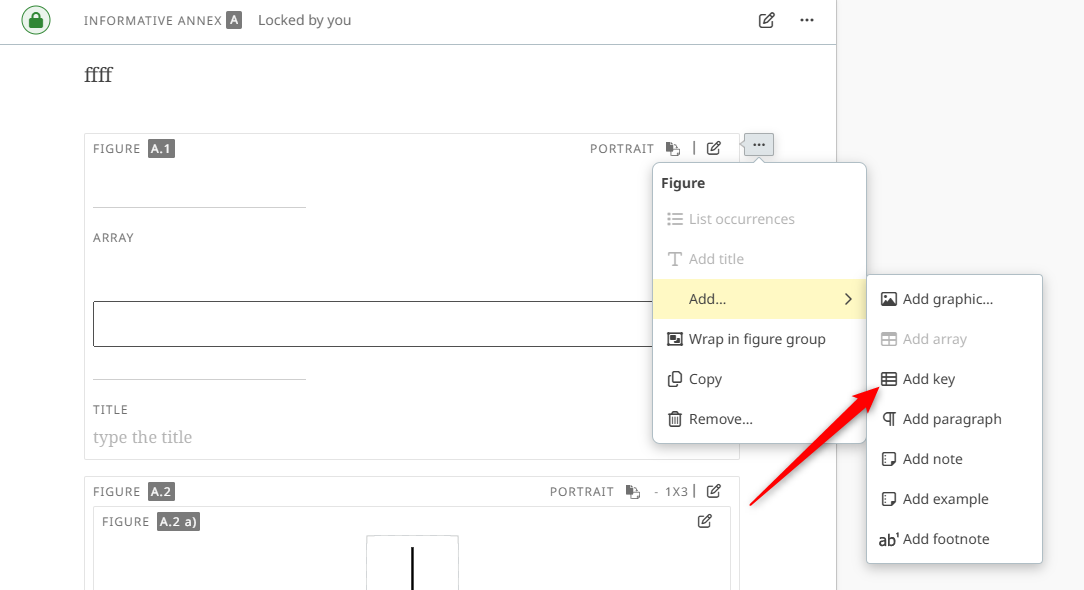

- Insert or copy the key text
- Insert the key images in the left column:
- Place the cursor in the cell
- Go to: INSERT → Graphics → Image
- Set the image size to Thumbnail
Adding the units statement
The units statement must be included within the Figure or Figure group element directly, and not inside the graphic or paragraph text.
Verify that a units statement is included in Figures, and add them if required:
- Click on the edit icon next to the figure
- Enter the statement in the Dimensions field (e.g., “Dimensions in millimeters”).

Missing figure Titles
Titles of Figures and Subfigures may be missing in imported documents.
They can be added by simply typing the title in the relevant figure or subfigure element field.
Missing or incorrectly formatted formulae
For formulae in a document:
- Complex formulae, fractions, and matrices should appear on separate lines and preferably be numbered. They must be in a formula element
- Simple formulae and symbols should be typed inline along with the main document text (formatted as inline formula)
After import, formulae may be missing or altered. The document must be reviewed to ensure that formulae are present, error-free, and formatted using formula or inline formula elements.
Incorrectly formatted formulae must be corrected, and missing ones should be (re)inserted:
- Go to INSERT → Formula
For more details on how to do this, refer to the article: Add formula.
Missing Table footnotes in the Table wrap footer
Table footers may be missing in the imported document. Verify all tables include a complete table footer.
To add a new footnote:
- Go to: REFERENCE → Footnote → Footnote
- Add footnote text from the source Word or PDF document.
- Ensure no space exists between the text and footnote indicator.
To link to an existing footnote:
- Place the cursor at the insertion point
- Go to: REFERENCE → Footnote → Link to an existing table footnote
- Ensure there is no space between the text and the footnote.
If the footnote text is present in the Table footer with a question mark icon in front of it:

- Place the cursor at the insertion point in the table cell.
-
Go to REFERENCE → Footnote → Link to an existing table footnote and identify the correct footnote text.
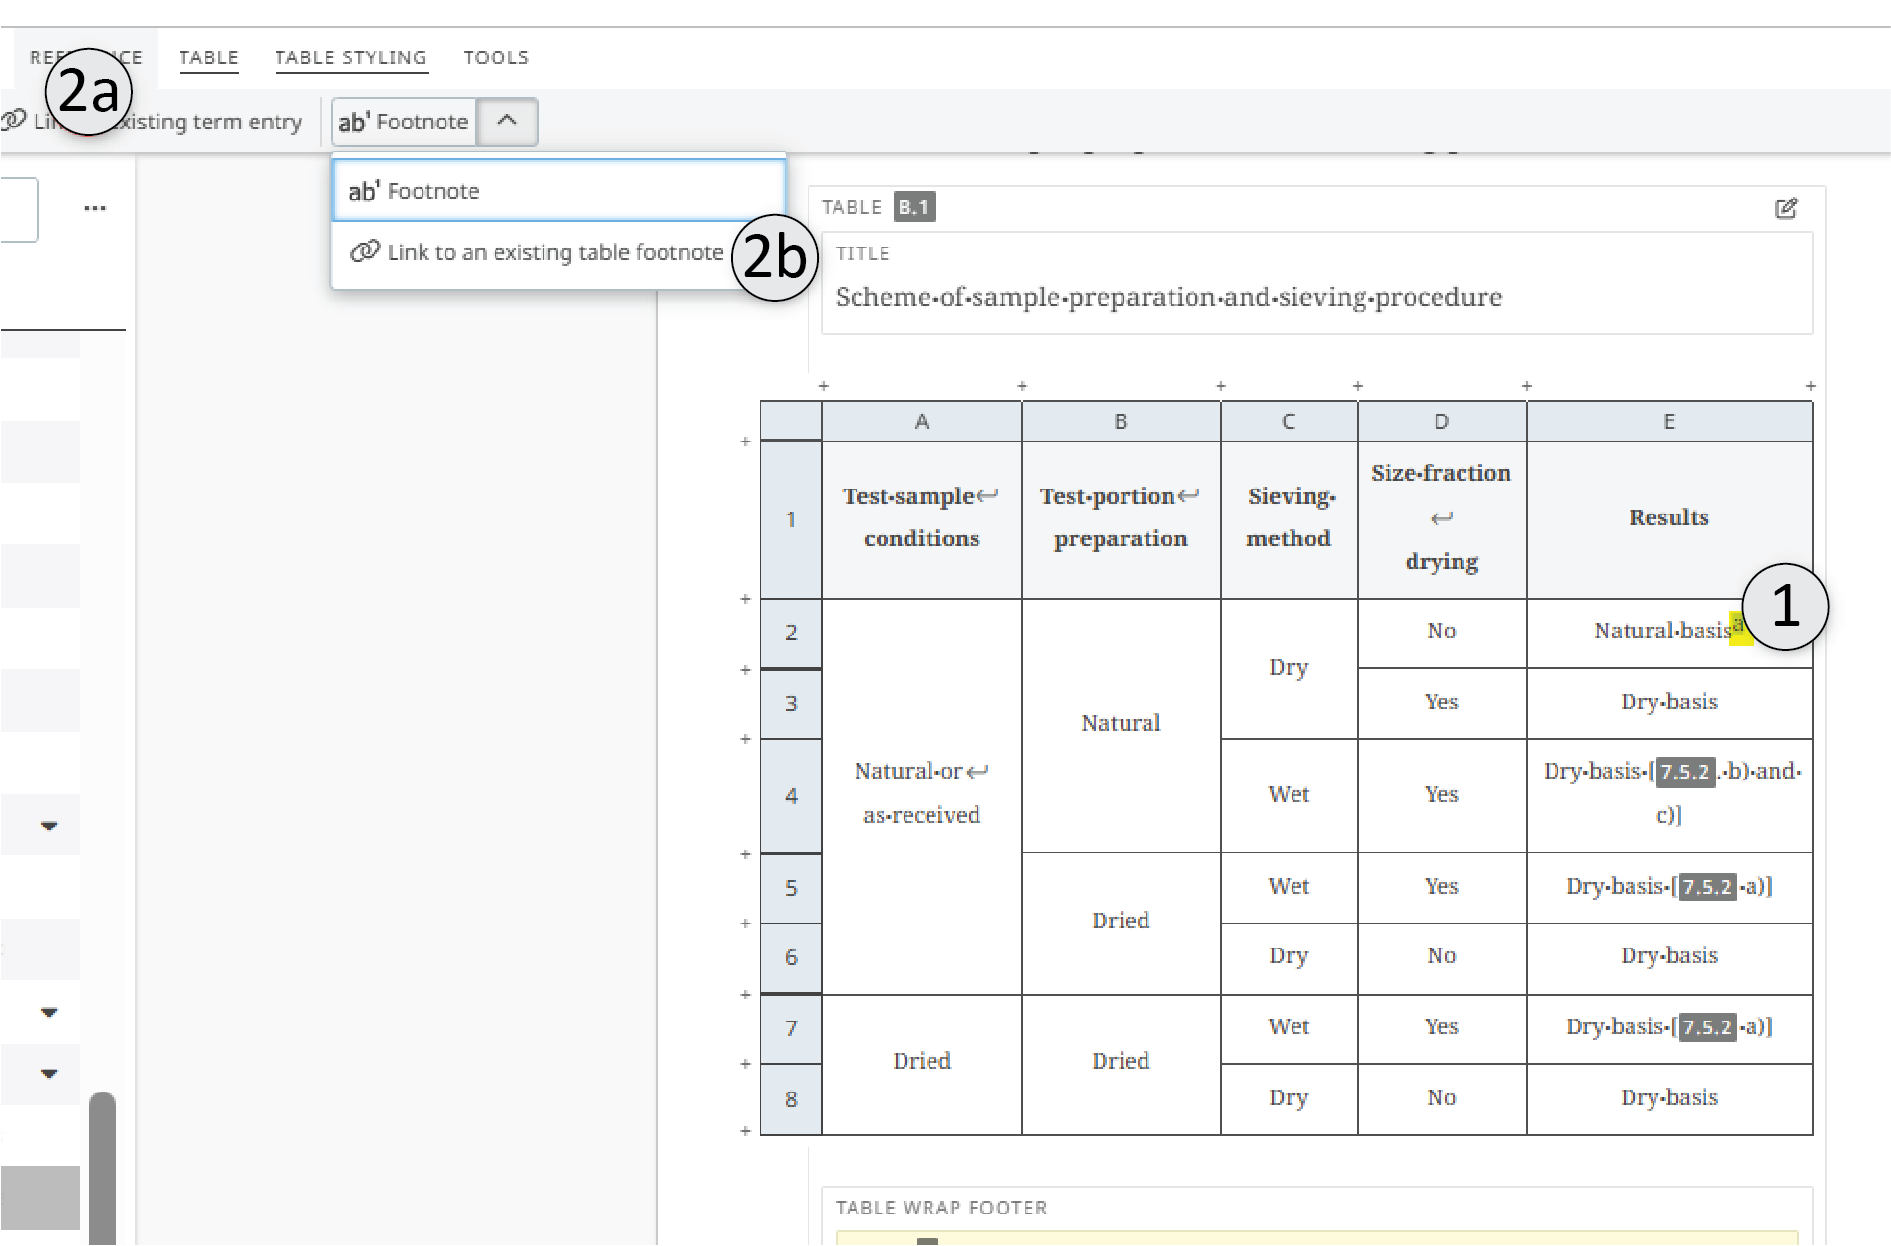
- The question mark icon should now become a letter footnote indicator, and the footnote letter should also be in the table cell.
- Ensure there is no space between the text and the footnote.
- Delete any obsolete footnote text in the table cell if necessary.

For more details, refer to the article: Managing tables (section: Add table footers and footnotes)
Adding or changing Table borders
Table borders are the lines of the tables in the document. Importing documents may set border thickness to zero. and they will no longer be visible in the document output (PDF or Word).
Required formatting:
- Outside borders: 2 px
- Inside borders: 1 px
Ensure table border thickness is correct throughout the imported document and that this thickness difference is visible in the output PDF.

To apply borders:
- For outside borders, place the cursor in the outer cell(s) to alter the table border
-
Go to TABLE STYLING → Line weight → 2px
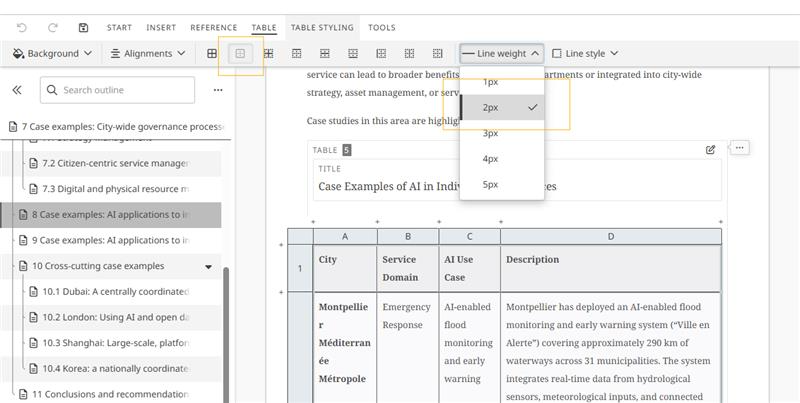

- For inside borders, place the cursor in the inner cell(s)
-
Go to TABLE STYLING → Line weight → 1px
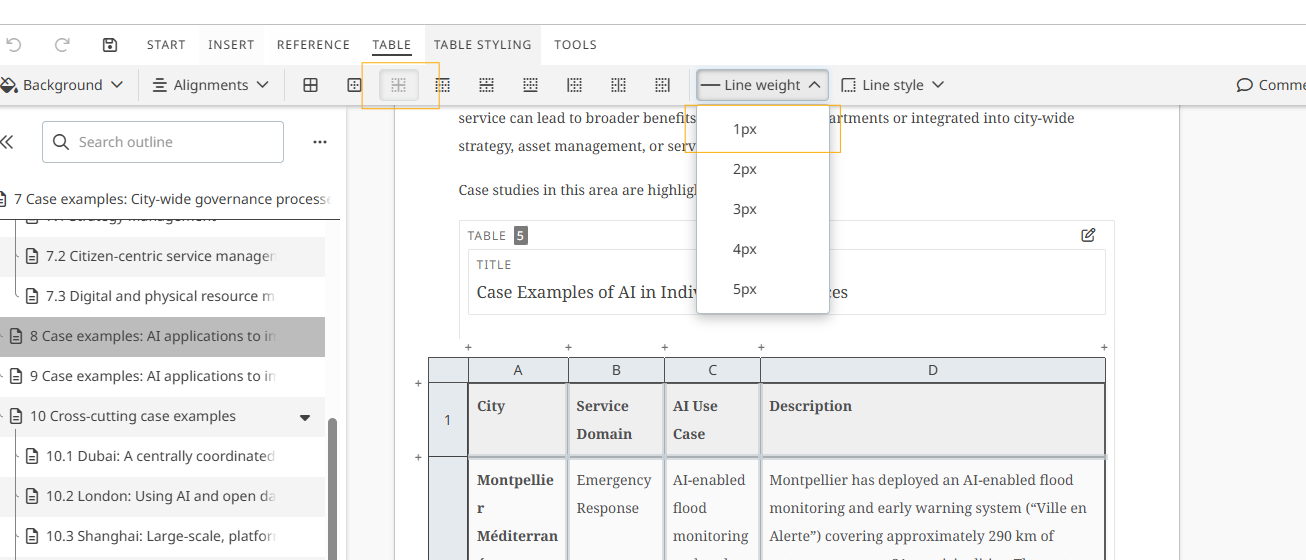

- To select the entire table for applying the same border, click the upper left grey square.
Verifying lists
If mixed lists existed in the imported document, that is if they contained a mix of numbered and unnumbered items, upon importing, they would be modified to either only numbered or only unnumbered items for the whole list.
To correct the applied list formatting:
- Highlight the relevant list.
- Go to the START menu
- Apply numbered or unnumbered formatting as required.

For more details, refer to the article: Working with lists.